


Today let us understand the process about creating custom order attributes. In this tutorial, we are going to achieve following :-
-
- Create custom order attribute
- Save data of the created attribute
- Show that attribute in the admin grid.
so, lets start the process…
To create the custom order attributes we need to follow below steps.
-
- Create a basic custom module
- Create the custom order attribute
- Save the order attribute using observer
- Syncing the sales_order table and sales_order_grid table
- Show order attribute in grid
Step 1: Create a basic custom module
There are two locations where a module can be located in a Magento 2 application.
The first location is an app/code directory. This directory is used to add all custom and 3rd-party Magento 2 modules. This location is usually used by development agencies, internal or in-house developers in order to simplify a development process.
The second location is a vendor directory. All the Magento 2 core modules are located under vendor/magento. Example –
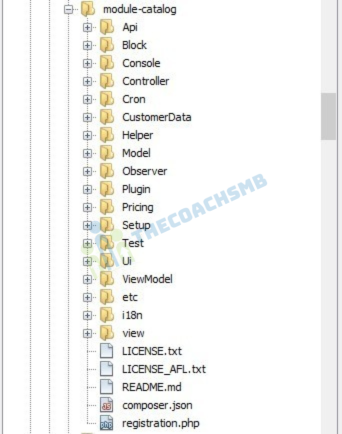
Complete custom module in Magento2
The above is a standard module folder structure. This is the folder structure of the Magento catalog module.
1. Create the following folders in the magento project root directory (ex. – C:\xampp\htdocs\magento2):
- app/code/Thecoachsmb
- app/code/Thecoachsmb/OrderAttr
The Thecoachsmb folder is the module’s VendorName, and OrderAttr is the ModuleName.
Note: If you don’t have the code folder in your app directory, create it manually.
Now, create app/code/Thecoachsmb/OrderAttr/composer.json:
Contents would be:
{}
This file will be loaded by Composer every-time you run it even though we are not actually using Composer with our module.
2. Declaration of Module
It is necessary to create etc folder and add the module.xml file in it
app/code/Thecoachsmb/OrderAttr/etc/module.xml
Contents would be:
<?xml version="1.0"?>
<config xmlns:xsi="http://www.w3.org/2001/XMLSchema-instance" xsi:noNamespaceSchemaLocation="urn:magento:framework:Module/etc/module.xsd">
<module name="Thecoachsmb_OrderAttr" setup_version="1.0.0">
     <sequence>
         <module name="Magento_Sales"/>
     </sequence>
 </module>
</config>
3. Registration of Module
To register the module, create a registration.php file in the app/code/Thecoachsmb/OrderAttr/registration.php
Contents would be:
<?php
\Magento\Framework\Component\ComponentRegistrar::register(
	\Magento\Framework\Component\ComponentRegistrar::MODULE,
	'Thecoachsmb_OrderAttr',
	__DIR__
);
4. Activate the Module
Now its time to enable our moule. Type below command in the magento project root directory (ex. – C:\xampp\htdocs\magento2) as:
php bin/magento module:enable Thecoachsmb_OrderAttrNow that you have enabled the module first time, so you have to upgrade the database of the module by using this command line:
php bin/magento setup:upgrade
php bin/magento setup:static-content:deploy -f
Step 2:- Create the custom order attribute
Now, we will create attribute “custom_order_attribute”. With this upgrade data, this attribute is created in the sales_order table and sales_order_grid table.
To create in the sales_order_grid table we are using ‘grid’ => true.
File:- Thecoachsmb\OrderAttr\Setup\UpgradeData.php
<?php

namespace Thecoachsmb\OrderAttr\Setup;

use Magento\Framework\Setup\ModuleContextInterface;
use Magento\Framework\Setup\ModuleDataSetupInterface;
use Magento\Framework\Setup\UpgradeDataInterface;
use Magento\Sales\Setup\SalesSetupFactory;

/**
* Class UpgradeData
*/
class UpgradeData implements UpgradeDataInterface
{
 private $salesSetupFactory;

 public function __construct(SalesSetupFactory $salesSetupFactory)
 {
     $this->salesSetupFactory = $salesSetupFactory;
 }

 public function upgrade(
     ModuleDataSetupInterface $setup,
     ModuleContextInterface $context
 ) {
 if (version_compare($context->getVersion(), "1.0.1", "<")) {
     $salesSetup = $this->salesSetupFactory->create(['setup' => $setup]);
     $salesSetup->addAttribute(
     'order',
     'custom_order_attribute',
     [
         'type' => 'varchar',
         'length' => 5,
         'visible' => false,
         'required' => false,
         'grid' => true
     ]
   );
       }
    }
}
Run the below query to update the database with our changes.
php bin/magento setup:upgrade
and
php bin/magento setup:static-content:deploy -f
Step 3: Save the order attribute using observer
After creating the attribute, we want to save the value for this attribute. Here i am approaching the event and observer method. Here I am using sales_order_save_after event to update the order attribute. For this we want to add the events.xml , observer files respectively
Let’s create new events.xml file in Thecoachsmb/OrderAttr/etc/events.xml with the following content:
<?xml version="1.0" ?>
<config xmlns:xsi="http://www.w3.org/2001/XMLSchema-instance" xsi:noNamespaceSchemaLocation="urn:magento:framework:Event/etc/events.xsd">
    <event name="sales_order_save_after">
        <observer instance="Thecoachsmb\OrderAttr\Observer\Sales\SetOrderAttribute" name="thecoachsmb_orderattr_observer_sales_order_save_after"/>
    </event>
</config>
And Now the observer file
Thecoachsmb\OrderAttr\Observer\Sales\SetOrderAttribute.php with the following content.
<?php
namespace Thecoachsmb\OrderAttr\Observer\Sales;

class SetOrderAttribute implements \Magento\Framework\Event\ObserverInterface
{
    public function __construct(
        \Psr\Log\LoggerInterface $logger
    ) {
        $this->logger = $logger;
    }

    public function execute(
        \Magento\Framework\Event\Observer $observer
    ) {
        $order= $observer->getData('order');
        $order->setCustomOrderAttribute("ABC");
        $order->save();
    }
}
Step 4: Syncing the sales_order table and sales_order_grid table
Now, we need to tell Magento to copy values from sales_order to sales_order_grid table when a new order is created. That is done by di.xml file. Create di.xml in Thecoachsmb/OrderAttr/etc/di.xml with the following content.
<?xml version="1.0"?>
<config xmlns:xsi="http://www.w3.org/2001/XMLSchema-instance" xsi:noNamespaceSchemaLocation="urn:magento:framework:ObjectManager/etc/config.xsd">
<!--Sync the sales_order table and sales_order_grid-->
    <virtualType name="Magento\Sales\Model\ResourceModel\Order\Grid" type="Magento\Sales\Model\ResourceModel\Grid">
        <arguments>
            <argument name="columns" xsi:type="array">
               <item name="custom_order_attribute" xsi:type="string">sales_order.custom_order_attribute</item>
            </argument>
        </arguments>
    </virtualType>
</config>
Step 5: Show order attribute in grid
Next, we need to tell the sales_order_grid.xml UI component to create a column for our new attribute. Create a new xml file in Thecoachsmb/OrderAttr/view/adminhtml/ui_component/sales_order_grid.xml with the following content.
<?xml version="1.0" encoding="UTF-8"?>
<listing xmlns:xsi="http://www.w3.org/2001/XMLSchema-instance" xsi:noNamespaceSchemaLocation="urn:magento:module:Magento_Ui:etc/ui_configuration.xsd">
    <columns name="sales_order_columns">
        <column name="custom_order_attribute">
            <argument name="data" xsi:type="array">
                <item name="config" xsi:type="array">
                    <item name="filter" xsi:type="string">text</item>
                    <item name="label" xsi:type="string" translate="true">Custom Order Attribute</item>
                </item>
            </argument>
        </column>
     </columns>
</listing>
Now flush the cache by following command:-
php bin/magento c:f
Now, refresh the sales order page you will see the column Custom Order Attribute in the admin grid with value ABC.
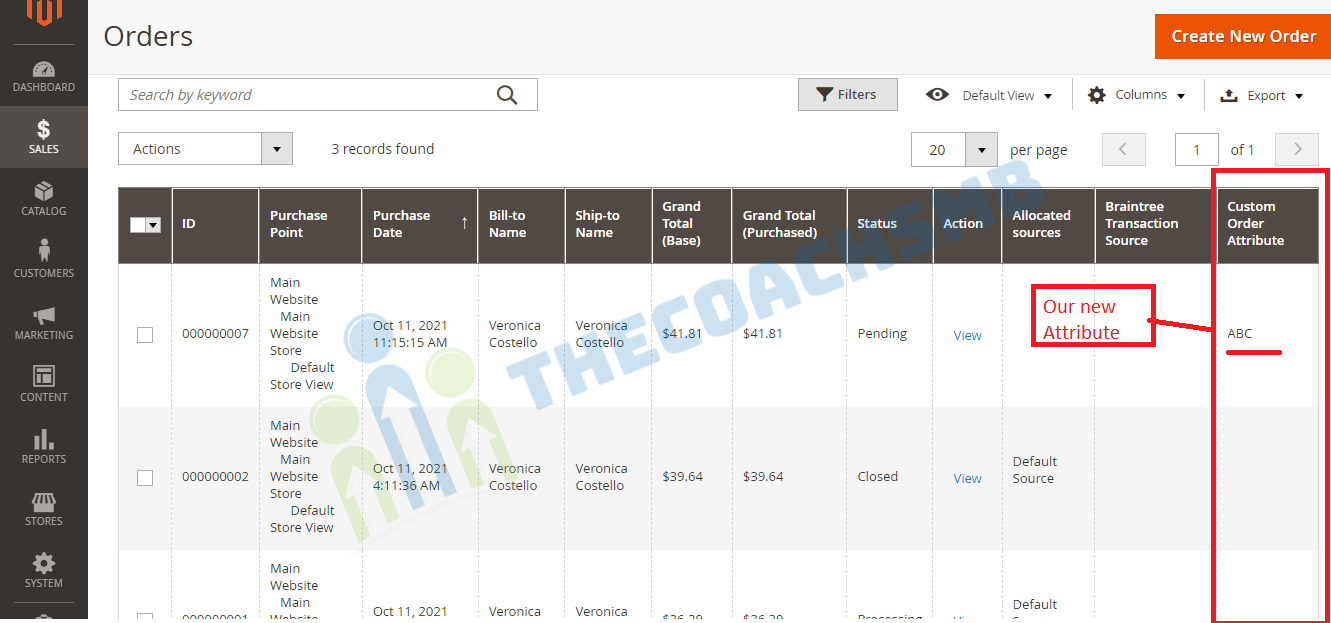
If you have any issue in adding order attribute programmatically in Magento 2, then feel free to contact us.
Do watch this video:-
I would like to hear back from you, so do comment below.
Happy Learning !!
Thank you !!